Trying to create an online course looks like trying to put up a shelf.
If you’ve got a well-stocked toolkit, the setup is quick and easy. You simply follow a few steps, and, job done, you can organize your books and enjoy your new shelf.
Without a good toolkit, though, the process becomes daunting, complicated, and time-consuming. Or, worse, you’ve got a toolkit (you bought one just to put up your shelf.) But it’s poorly organized. It doesn’t have the right tools. And with so many hidden compartments and unidentifiable gadgets, it’s hard to find the ones you could use to do the job.
What’s DIY got to do with eLearning, though?
The two scenarios may seem poles apart, but the same principle applies. Creating an online course can be daunting without the right resources in place. Here’s where having a well-designed and well-equipped learning management system (LMS) comes in.
A good LMS simplifies what can be a complex task. Guiding you through the process, it’ll give you all the tools you need (without having to hunt to find them) to create a training portal that showcases your courses in the best possible light.
How to create an online course: A 10-step guide
So, what exactly are those tools and how can you use them to create online courses? The good news is, if you’ve chosen a well-designed LMS, learning to create an online course will be an intuitive, easy, and self-explanatory process.
But to give you an idea of what to expect, we’ve gathered everything you need to know into one handy 10-step guide. You can also use this as a checklist of LMS features to look out for when choosing a training platform.
Ready to breeze through the process? Good. Let’s walk you through the different stages.
- Check access rights
- Adjust settings
- Apply rules and structure
- Create the content
- Choose your content types
- Add assessments
- Recognize and reward
- Invite learners and assign courses
- Promote your course
- Track and report on results
Step 1. Check access rights
Your LMS will assign different permissions to different user types. For example, you may have learners, instructors, and admins.
To create online courses, you’ll most likely need to be logged in as an administrator.
Step 2. Adjust settings
Customize your course by assigning a unique set of global attributes for the following:
Portal
What top-level content best defines your course? Decide what you want your users to see when they log into their learning portal. You will, of course, need a name and description. But you might also want to assign a category or level, upload an introducing video, or add an image.
Tip: Make sure the information you use here is clear, on-brand, and appealing. And, remember, most systems will have a fixed set of image requirements that you’ll need to comply with. So, check the size and spec before you upload your graph.
Capacity
Do you need to limit numbers or will you be keeping your registration open?
If your online course includes an instructor-led training session, chances are you’ll need to set a maximum number of participants. In which case, your LMS will prompt you to assign a capacity figure. Once that number is reached, the course will be automatically removed from the course catalog.
Tip: Your instructors should still be able to enroll users manually if they want to. If the course is designed for a select group only, use a “Hide from catalog” option to prevent others from seeing it.
Time
Is the course mandatory? If so, you might want to add a start and end date. Or, assign a set number of days. As well as boosting course completion, doing this helps you with reporting and evaluation.
Tip: Make sure the duration is achievable and compelling. In other words, it needs to be long enough to be able to complete, but still, keep momentum and keep motivation and engagement levels high.
Display
How do you want your courses to appear in your catalog? Most LMSs will default to alphabetical order. But you should be able to control how they display.
This is helpful if you want to group courses together. Or, if you want to show first your new courses, mandatory, or popular ones.
Tip: Look for an “active” or “inactive” checkbox and use it to control the visibility of your course in the catalog. This will keep it hidden until you’re ready to go live.
Price
If you’re selling your course externally, here’s your chance to add details of payment, including pricing, discounts, and payment methods.
Tip: Remember to check this regularly and update it as and when your pricing structure changes.
Step 3. Apply rules and structure
You’ve set up your portal. Now it’s time to determine how your course will function. Key aspects to consider here are:
- Learning journey: Do your modules need to be completed in a rigid sequential order or can your users navigate themselves?
- Learning path: Is your course part of a wider learning experience? Does it have to be completed before users can progress onto another course? Setting up a learning path will help you organize courses and apply dependencies.
- Destination: When is your course considered “done”? Do learners have to complete all units or some of them are optional?
- Success: How is your user’s final score calculated? Using an average score across tests and assignments? Or tests only?
Step 4. Create the content
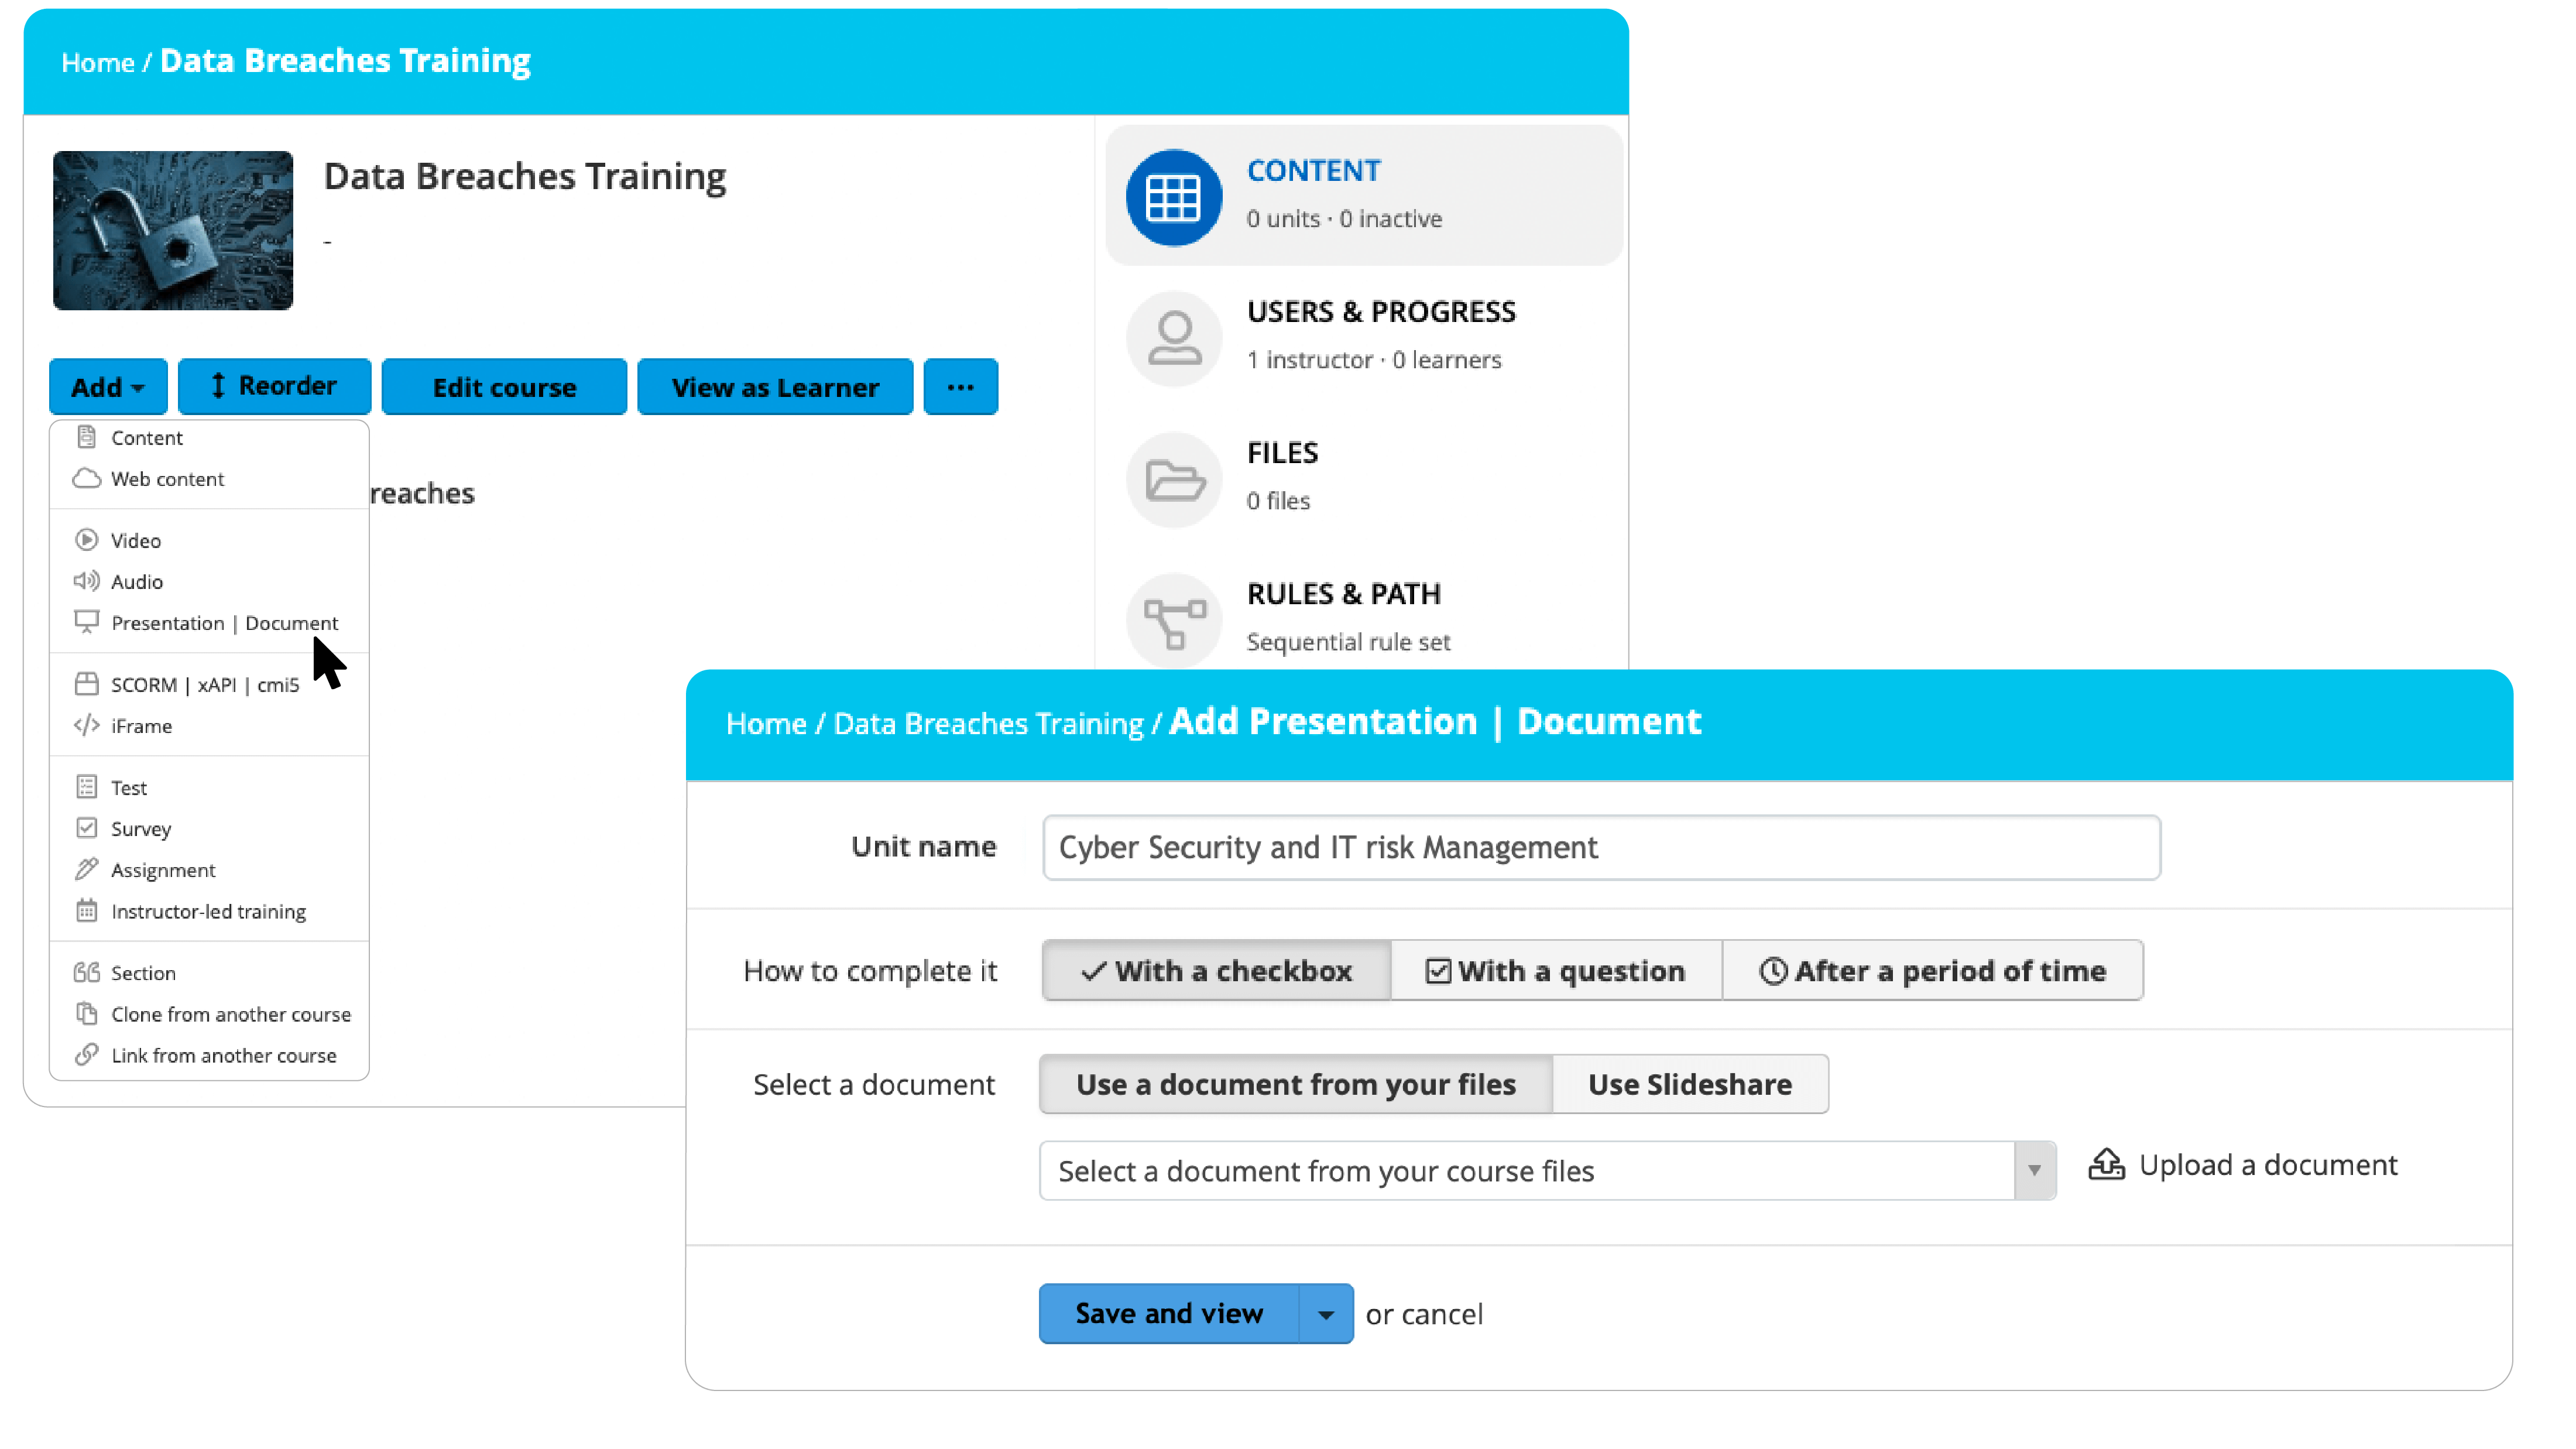
When you create an online course, building the content may seem like the most overwhelming task of all. But with an LMS, uploading your content, or even creating it on the spot, is easy.
Either create courses from scratch or drag and drop in content you’ve already prepared or sourced externally. Your LMS will prompt you to name each unit and select a completion option (for example, with a checkbox, with a question, or after a certain time). Then you’re good to go.
Maintaining your course content is simple, too. Just go to the specific unit you want to update, and add new material or remove outdated information, so your training’s always current.

Create online courses in just a few clicks with TalentLMS
The training platform that users consistently rank #1.
Easy to set up, easy to use, easy to customize.
Step 5. Choose your content types
People learn in different ways. So you should try to create an online course that caters to different learning types.
You also need to consider different learning intentions. The outcome or goal of each different module will determine how it should be delivered. For example, a purely text-based unit won’t work if you’re trying to show a sales rep practical ways to handle difficult conversations. But it can be a good way to describe the theory behind it.
To create online courses that deliver on both these levels, a good LMS must offer a full range of content options. Here’s our must-have list, with tips on what to use and when:
Text
A one-way form of learning, text-based content is the least dynamic and exciting format. But presented in the right way, text has its uses.
It appeals to learners who like to see information written down before they digest it. It’s a familiar format that everyone will recognize and feel comfortable with. It’s cheaper and quicker to produce. And it doesn’t come with any technical requirements or place any demands on low-bandwidth environments.
Good for: Explaining theories or concepts and providing background information on a topic.
Tip: Use images and visuals, pull quotes, bullets, subheadings, plain language, and other formatting tools to highlight key points and make the content more accessible.
Web resources
The internet is crammed full of content that can be repurposed to create online courses. Using content from external websites gives your course credibility and authority. It provides a different voice.
And it’s one of the most cost-effective and easy forms of content to deliver.
Good for: Sharing commentaries, articles, or thought leadership features.
Tip: External content is out of your control. Use it wisely and sparingly. And remember to run a quality control check on all of the content. Make sure you’ve got permission to use it and the bandwidth exists to support high-volume use. Also, carry out regular checks to make sure the page still exists. Because broken links = broken learning.
Video
Video is fast becoming the most popular format for communicating information online. And it’s eLearning’s secret weapon. Why? Because it encompasses elements from different learning styles (visual, auditory, written, and kinesthetic) in a single format.
The ultimate show and tell format, video is rich, engaging, attention-grabbing, accessible, and super shareable. And doesn’t discriminate on budget.
Good for: Demonstrating role-playing scenarios, delivering practical, “how-to” presentations, and sharing interviews, lectures, chalkboard-type lessons, and documentaries.
Tip: Using your LMS you should be able to add a video by uploading one you’ve already produced, recording one directly from your LMS, sourcing one on YouTube, or pasting in a URL.
Audio
Light may travel faster than sound, but the brain processes and decodes sound faster than it processes vision. Which is why you should consider using audio in its own right when you create an online course.
Audio content alone won’t set the eLearning world on fire. But it effectively fills that middle ground between the potential “meh” of text and the “wow” of video. It’s also less intrusive, placing less sensory demands on the learners than say, video.
Good for: Explaining concepts or sharing educational podcasts or soundbites.
Tip: Language becomes more prominent when communicating purely through audio, so pay extra attention to the tone, terminology, and jargon you use.
Presentations
If you work in L&D, chances are you’ve produced a fair number of eLearning presentations. And no wonder. Presentations are quick and easy to generate, versatile, cost-effective, and, in the right creative hands, very engaging.
The beauty of having an LMS is that it can take all of the presentations you’ve already produced and turn them into online content.
Good for: Packaging up different content types under the same branding. Sharing statistics, infographics, graphs, and high-level takeaways alongside text-based content.
Tip: Use your LMS to turn presentations into videos to deliver a more interactive experience.
Live sessions
Training can be an isolating experience if the content consists purely of online learning materials. Which is why blended learning (a combination of traditional, classroom-effect sessions and digital content) is so popular.
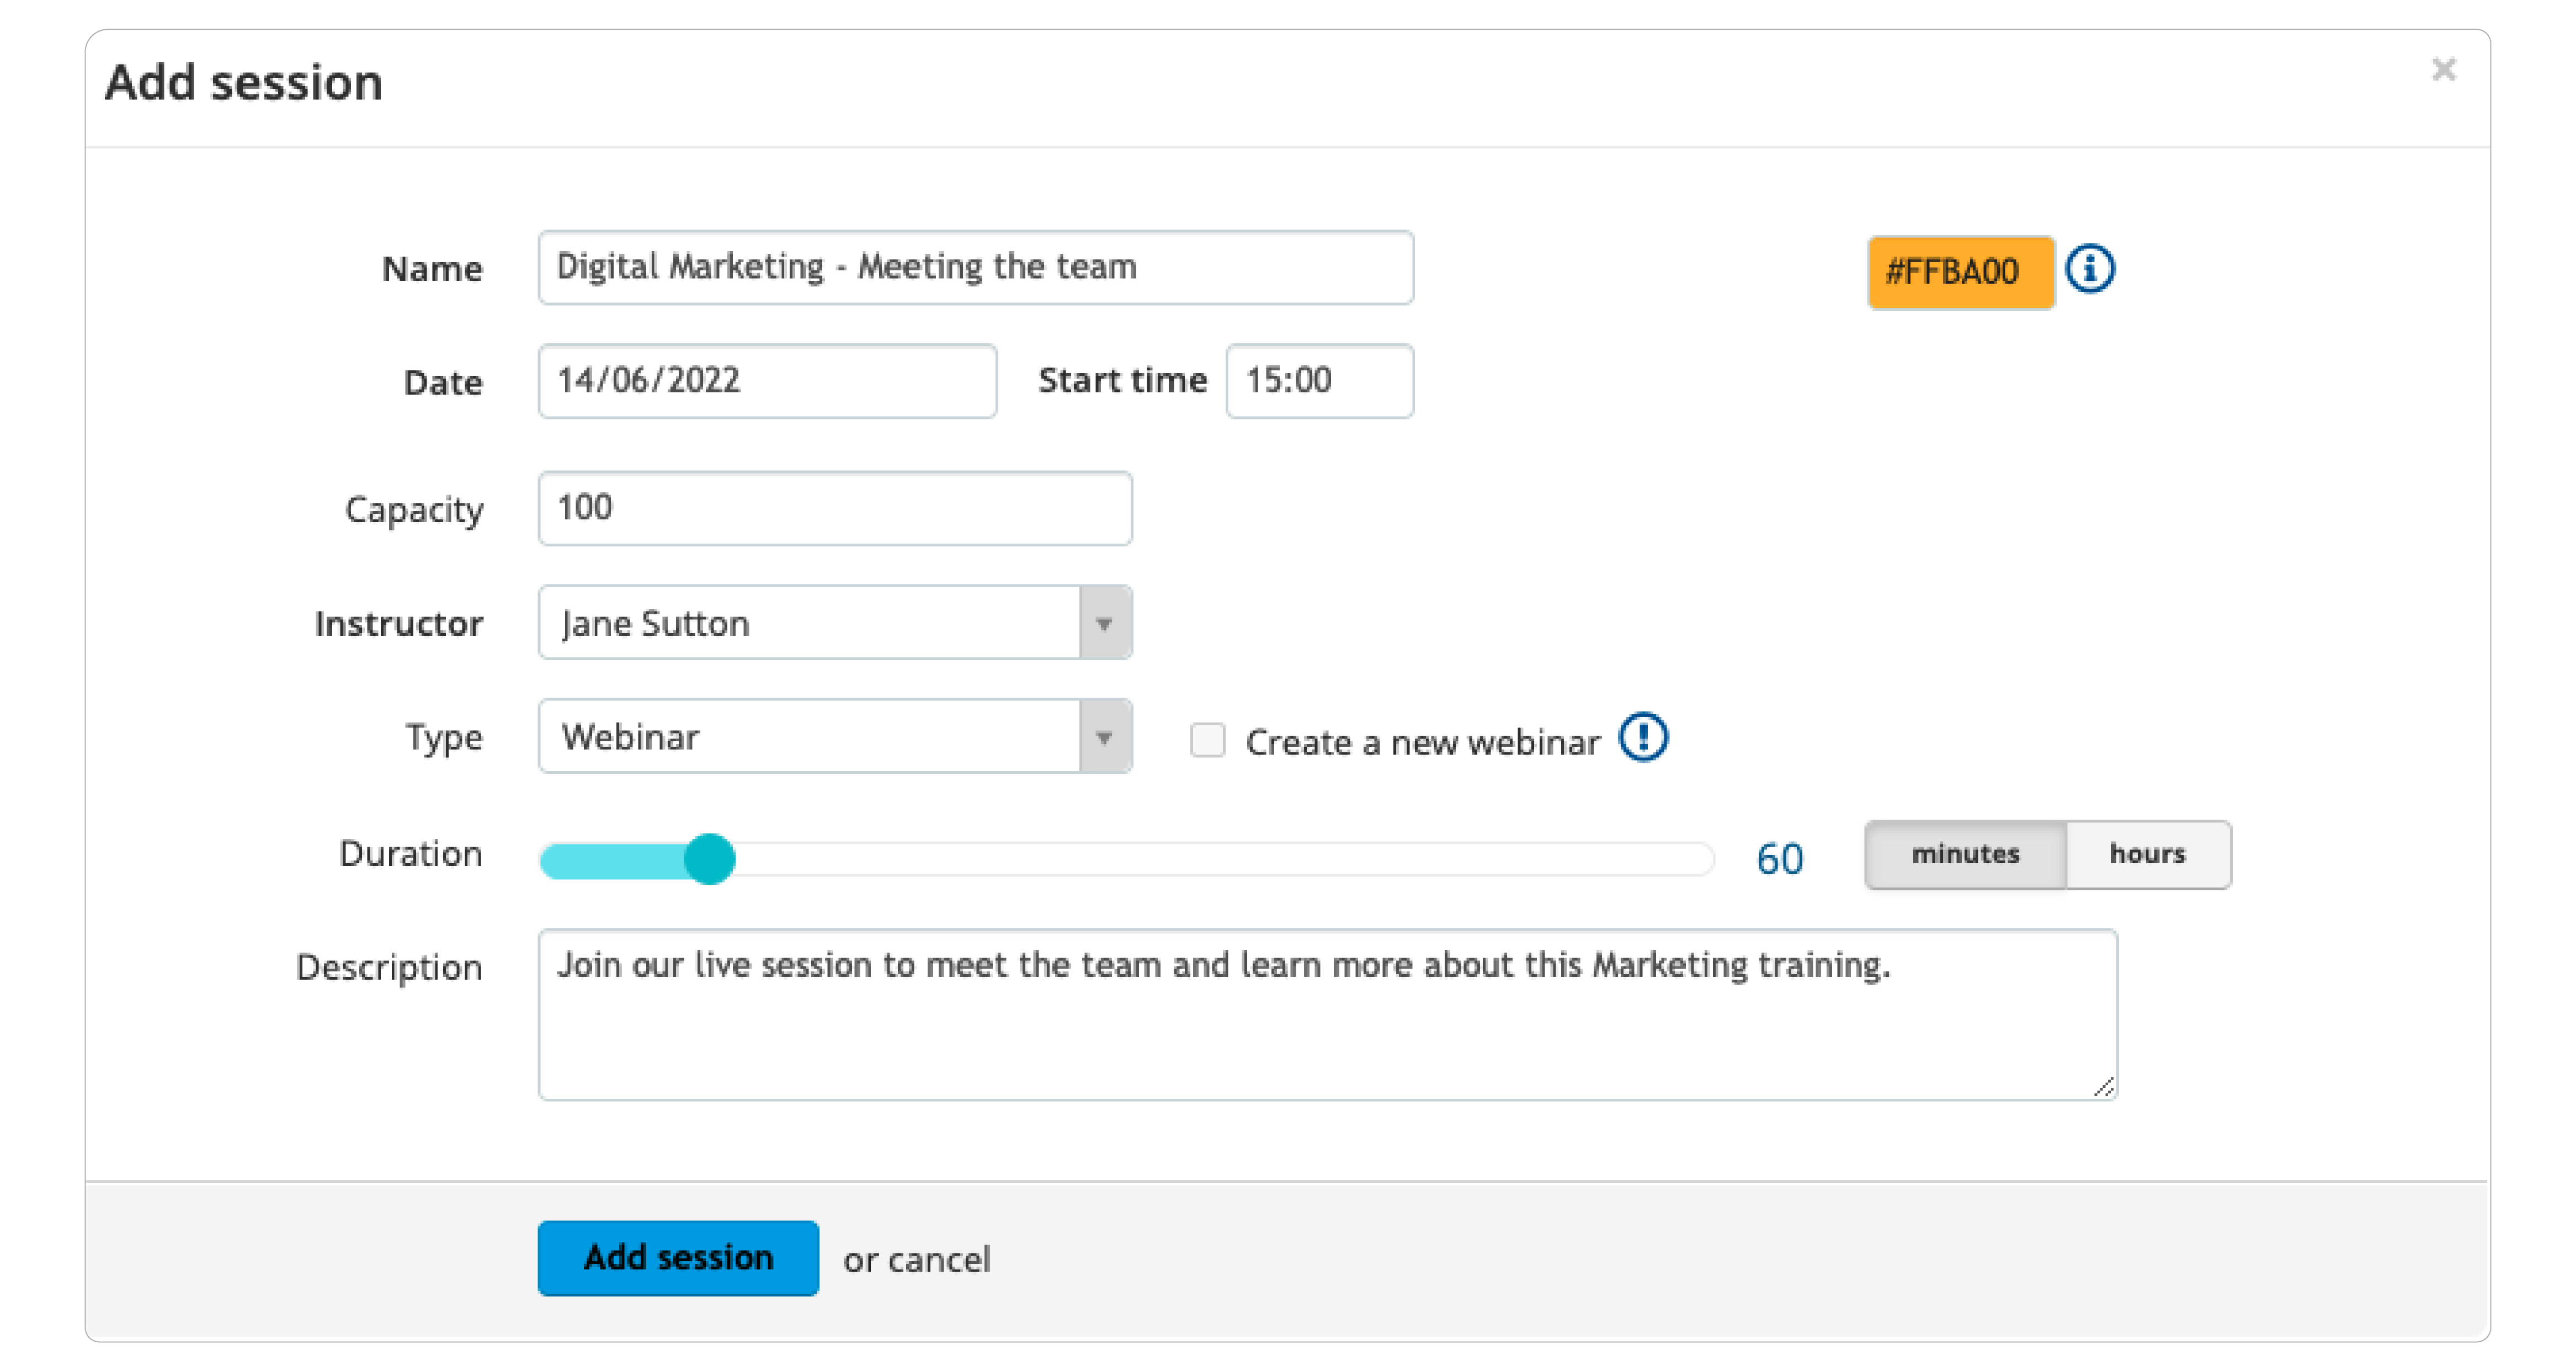
Using your LMS you can include live, instructor-led training sessions (either online or offline) when you create an online course.
Good for: Bringing globally-dispersed learners together, reinforcing knowledge through question and answer sessions, and networking.
Tip: Use your LMS to set up automated notifications about upcoming live training sessions.

Step 6. Add assessments
Not every online course will require you to test your learners’ knowledge. But, in many cases, adding a quiz will help learners refresh their memory or make sure they’ve understood the key points.
Once you’ve built your course content, it’s time to think about the assessments you want to include. And when you want to include them (at the end of each unit or course, for example, or dotted throughout).
Your LMS will support a range of quizzes and assessment types: from multiple-choice questions and drag-and-drop matching and ordering exercises to fill-in-the-blanks tests and open-ended assignments.
Tip: If you’re including open-ended assignments or questions, think about how you’ll review and grade the answers.
Step 7. Recognize and reward
Assessments are great for benchmarking and data. But they’re not hugely motivating. And they’re not traditionally associated with having fun, either.
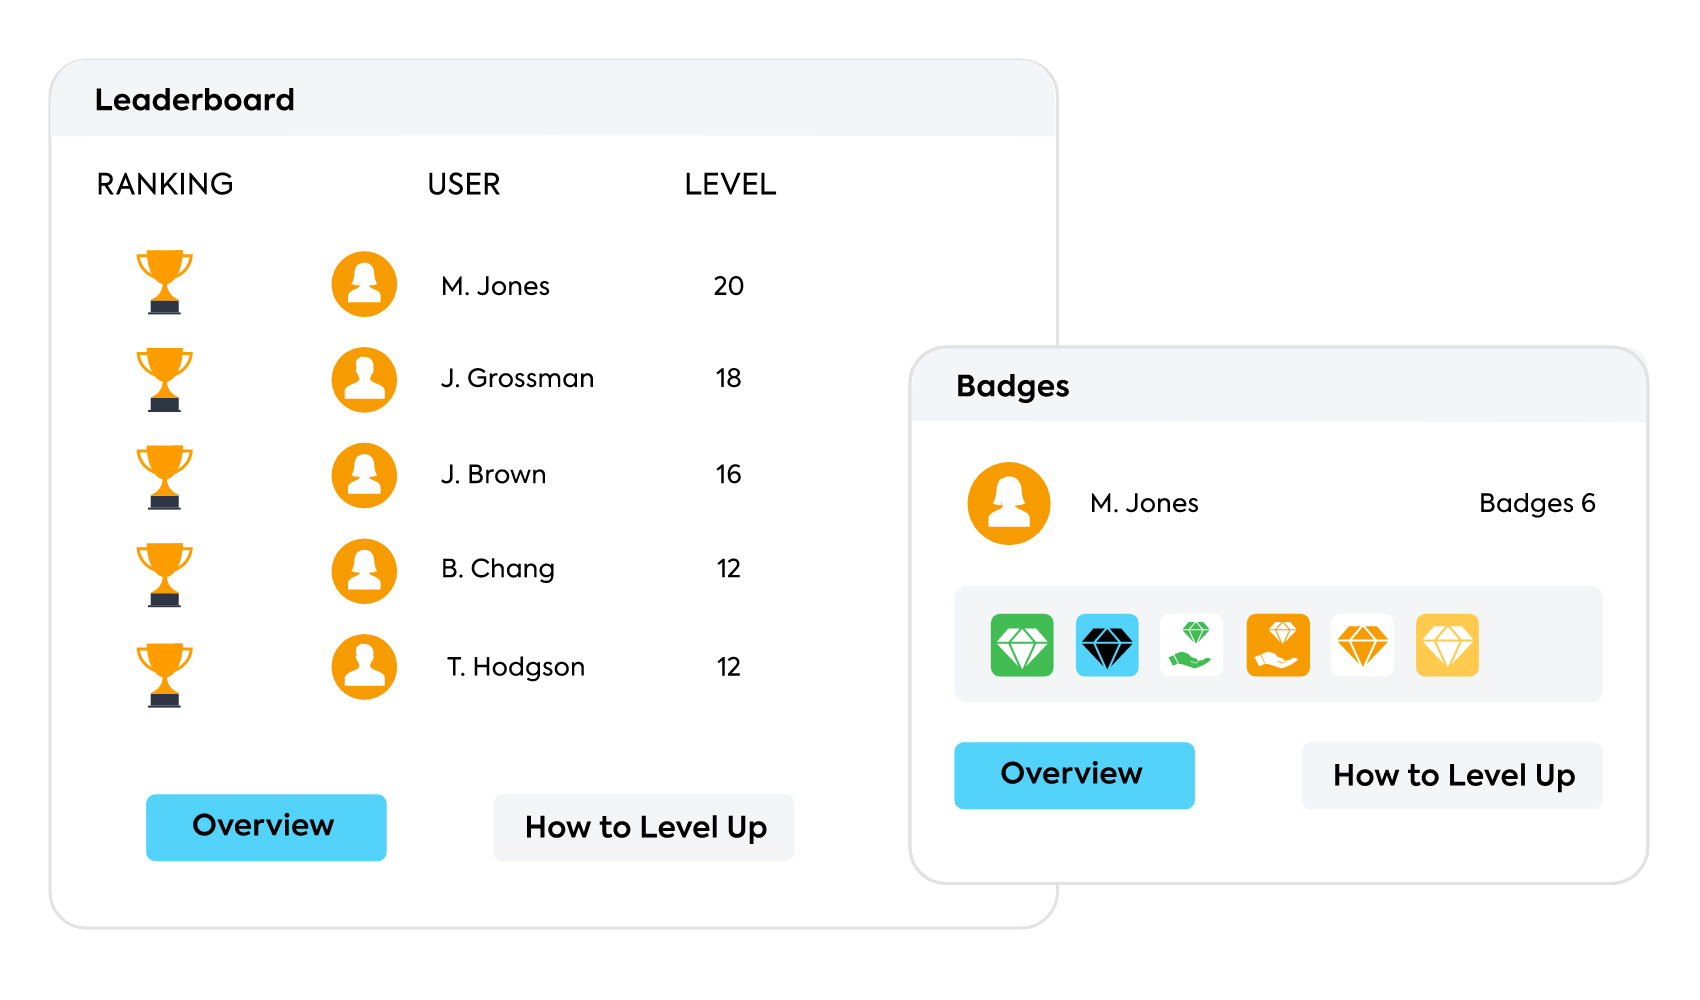
Create online courses that generate a buzz, by using the gamification elements (badges, points, levels, rewards, and leaderboards) embedded in your LMS. And give your learners something tangible to aim for at the end by adding your own customized, course-completion certificate.

Add a touch of fun to your training with TalentLMS!
Have your teams engage in friendly competitions and share badges and awards.
Easy to set up, easy to use, easy to customize.
Step 8. Invite learners and assign courses
Who’s your course for? You’ll have already scoped this out in the early stages of your design planning, but now’s the time to invite your learners to join your course.
Using your LMS, you can do this by:
- adding learners manually
- creating a rule that automatically assigns people to a specific group
- making the course public so that people can enroll if they want to
Step 9. Promote your course
With the bulk of the work to create an online course behind you, it’s time to go public.
Whether it’s an email to a specific group, or a message on your website, intranet, or learning portal, don’t forget to let people know a new course available. And share details like the timeframe, objectives, and any pre-course preparations or requirements.
Step 10. Track and report on results
The final link in the chain, with everything else in place it’s time to focus on how you’ll measure success. With your LMS, you can build and schedule custom reports to track results (e.g., attendance, assignment scores, and completion rates) and then share them with your stakeholders.
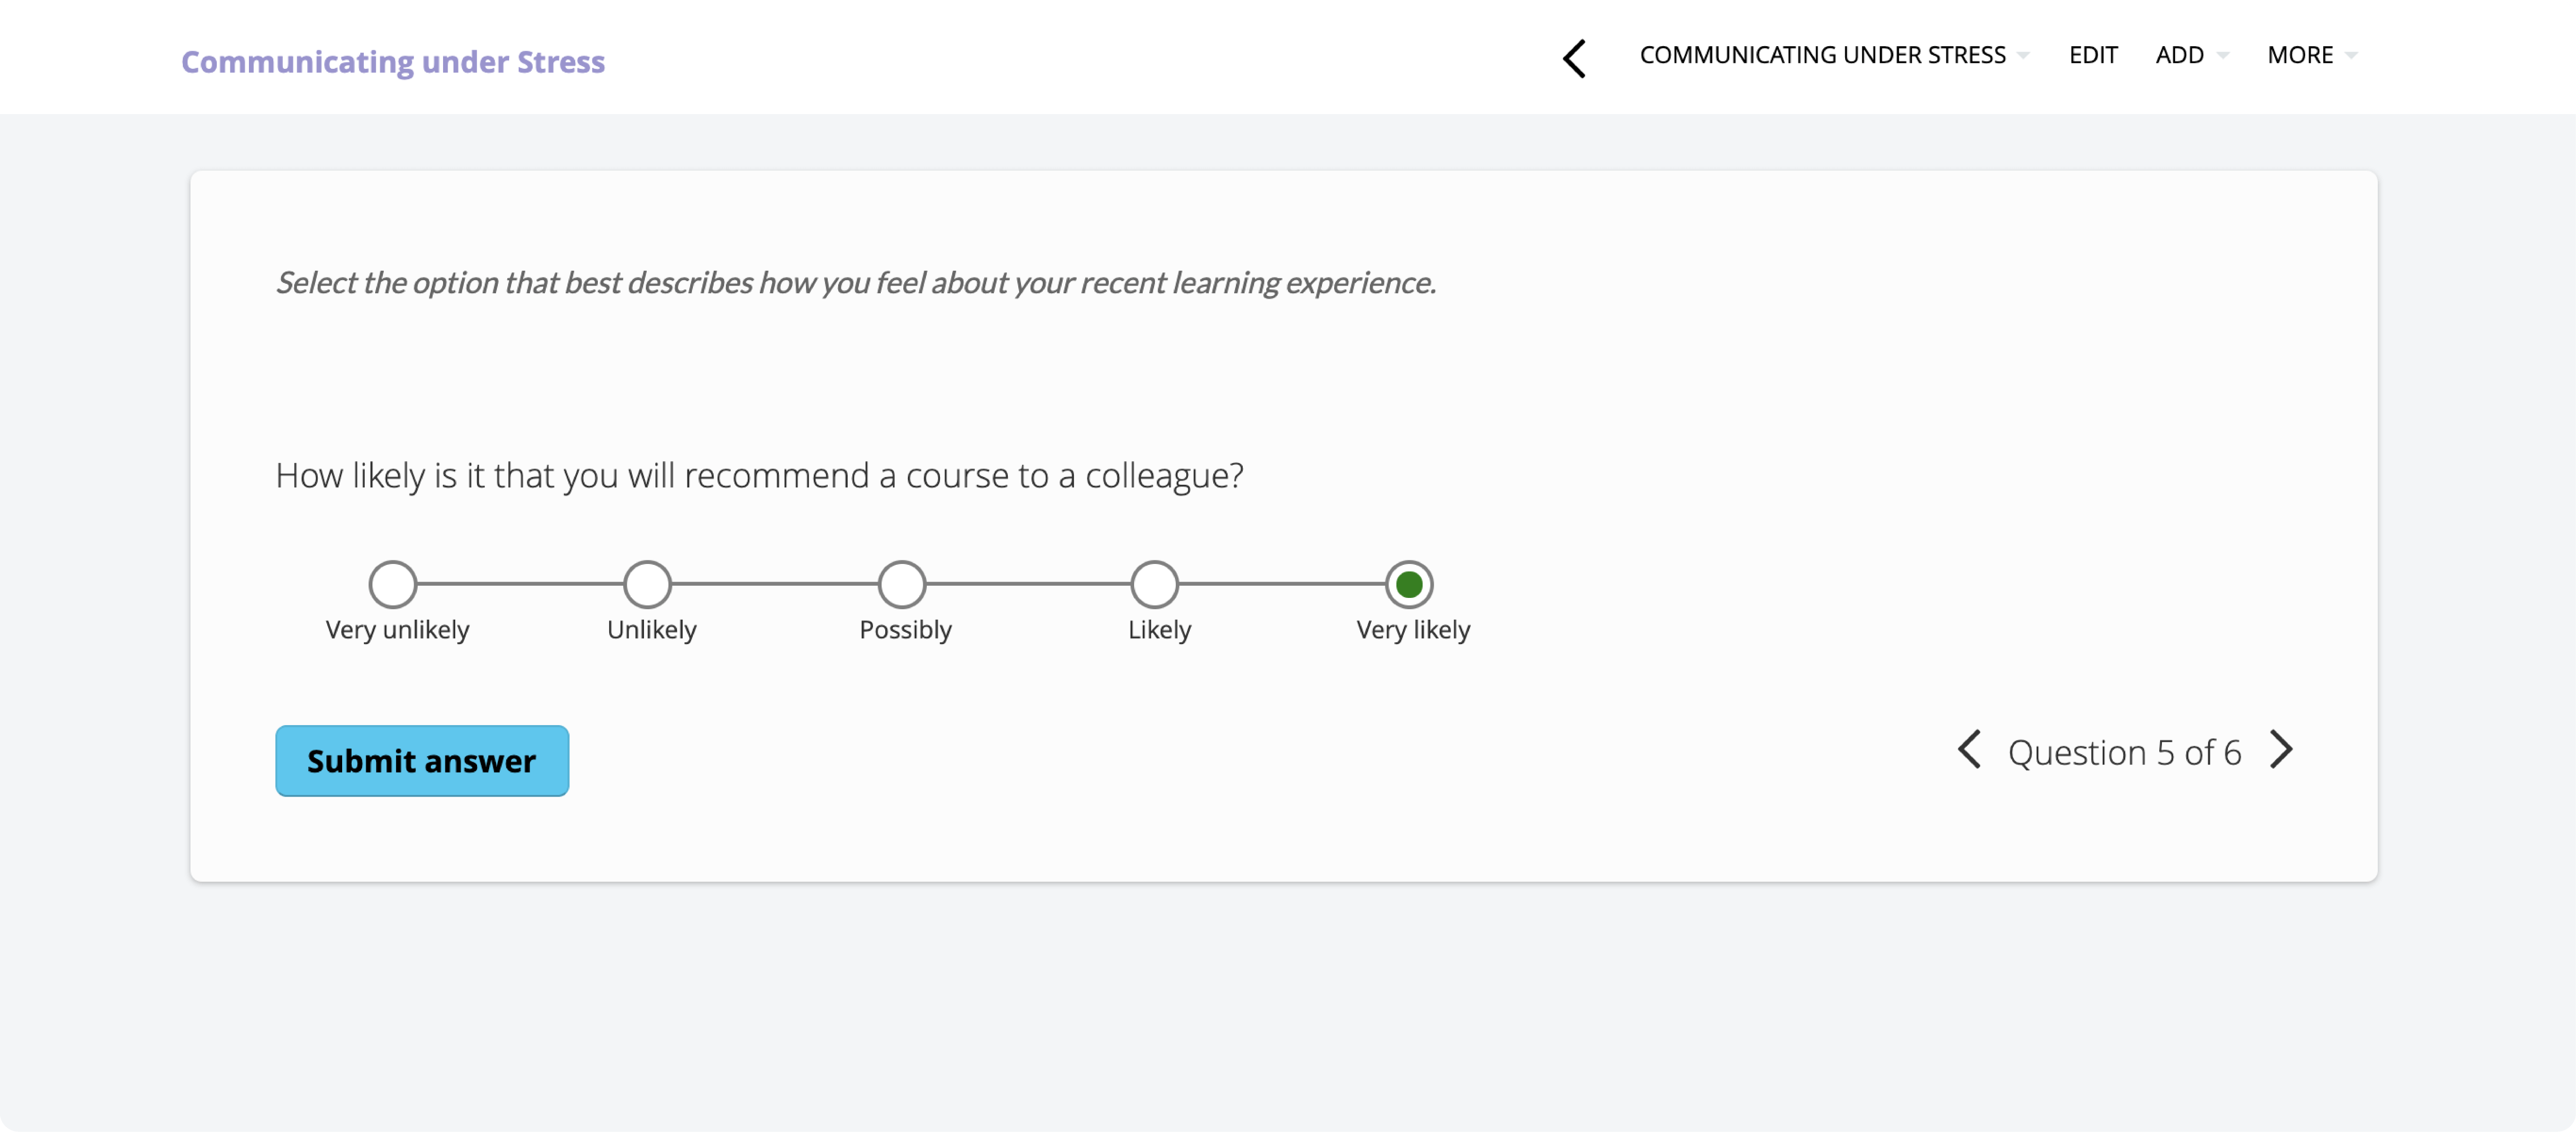
How was the course perceived by your learners? Gather feedback and gain insights by including post-training surveys.

Screenshot via TalentLMS: Post-training surveys
Looking for an eLearning platform to measure employee success?
Build custom reports to track results no time with TalentLMS.
The training platform that users consistently rank #1.
You control the process—and choose the books
We’ve presented these 10 steps to create an online course in a logical order. But that doesn’t mean you have to follow them as prescribed.
With an LMS, you’ll have the flexibility to review and revise a previous step as and when the need or situation arises.
You can do a lot with technology. And a good LMS will use the right technology to help create an online course that’s engaging and effective. Providing a solid shelf from which to display your eLearning resources, your LMS will categorize, curate, convert, and communicate your course content to your learners.
But it can’t do it alone.
To provide a course that’s engaging and delivers results takes more than a good LMS. It requires human input (you!). It takes creativity and critical thinking to create an online course your learners will truly love.
The good news is, with the tech taken care of, you can focus on adding value where it really matters. On strategy and substance. Take time early on to plan your approach and set your goals. Build a clear understanding of the content you’ll need to support that. And let your LMS do the rest.
In other words, use your LMS to put up the shelf. Then fill it with books your learners will want to read.

Leave a Reply